Google Analytics

Sunday, October 30, 2011

Halloween and Owl Baby Quilt


With minutes to spare, I finished mine and DH's Halloween costumes. We went as the Yip-Yip aliens from Sesame Street. We found the INSTRUCTABLE but made a few adjustments. First of all, we stitched up the sides for a better fit, we used a baseball cap turned around backwards and we also added a zipper on the mouth piece. I felt the zipper was a necessary addition for the consumption of adult beverages, BUT, we found that there was plenty of room INSIDE the costume for hands, beer, and whatever else! ;c) It was nice to unzip the mouth piece so that you could have a slightly better view of the ground when walking where there was not much lighting.


Before the Halloween party, there was my friend's Baby Shower. My friend Tiffany soon will be the mommy of "unbornbabynoname." It's always the correct assumption that anytime a gift is necessary, the gift will aLWAYS be . . a quilt. I would have liked to have been able to personalize the quilt . . but since the baby still has no name, I made a little quilt with an owl applique on it. She likes owls.. we both do!


I just used scraps of fabric to make up this little quilt. I was going for a more "modern" look, but after the applique was added it leans more to the traditional side. . my quilts seem to do that no matter how hard I try otherwise!


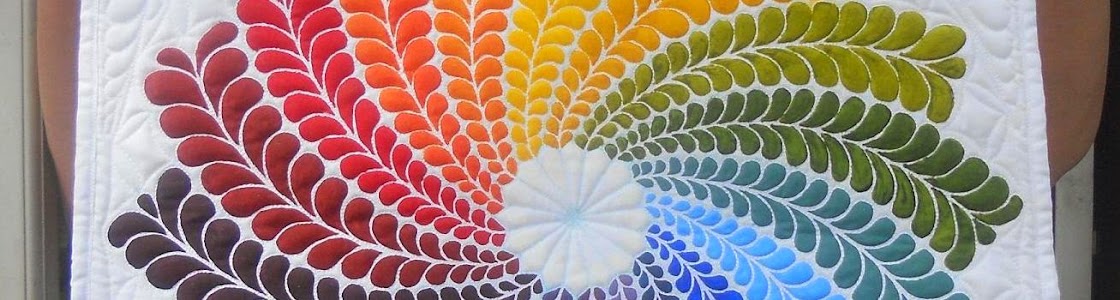
I quilted the background (white) areas with my version of McTavishing. . I really need a name for this stitch since it is far different than how the amazing Karen does hers.
I quilted the colored blocks with alternating feather plumes.
I went ahead and layered the quilt sandwich, fused the applique shapes, and then just free-motion stitched down the applique pieces with a narrow zig-zag stitch. My goal was to do the 3 layers and then add minky to the back as a 4th layer. THIS DID NOT WORK OUT AT ALL! I pinned them RST and stitched around the edges leaving a whole to flip it right side out. The edges turned out all lumpy and it was just way too thick. I do'nt know what I was actually thinking.
Oh well, it was a learning experience. So this is what the back looks like. . NOT what I originally planned, and NOT the prettiest, but it still has an interesting effect.


I might come back and do a tutorial on this little quilt in a few days - Right now I'm trying to figure out how to add a .pdf file to blogger. =c/ Without using scribd (i do not care for that program at all.)


One more thing - I just finished another Tee-shirt quilt for my friend Beth. She wanted to use up all of her college and high school running shirts. They were alot of fun to quilt around! ;c)

Monday, October 24, 2011

Fall Quilt - "Awesome" Fabric FQ Bundle

Last year for Christmas "Santa" got me the WHOLE line of "Awesome" fabrics by Sandy Gervais for Moda as a Fat Quarter Bundle. What I first did with those is I cut 1/4 of the short edge off of the FQ and then cut again to where I had 4 "charm" squares out of each FQ of the bundle.
With these squares I'm making a hexagon charm quilt. So this is what I have so far:


This is my hand/travel project I've been doing for awhile - It's coming along slowly. I think the English Paper piecing templates are about 3" wide.

So anyway the remaining bit of fabrics I was waiting for the Fall season to break out and do something with them. I came up with a plan do to Broken Dishes Blocks for the center - and have a big fat border with some fun appliques, using ONLY these fabrics.

I started out by picking out 18 fabrics from the bundle and cutting those into 16" squares.


Then I took each square and cut that up into 4- 8" smaller squares.

My pretty stack of 8" squares ;c)

I then arranged them by color ~


Then I paired them all up-


With a thin-lined pencil, on the back of the lightest square of each pair, I drew my stitching line 1/4" on each side of each diagonal.


I just lined up the square on my mat, and placed the ruler 1/4" away like this:


After all the lines were drawn, I pinned them Right Sides Together. I just used two pins on each side like so:


I then stitched on each line. Some people do this by just drawing ONE line on the diagonal, but I find I am more accurate if I draw the two stitching lines.


Now I press on both sides.


Then I cut on each diagonal, and also across each way.


I found a more efficient way to cut - by laying out your 4 sewn pairs on your mat like this. The red lines are where you would cut.

Then you have all of these cut in less strokes.

Then I took all my little HSTs and pressed them with starch.

There was 8 of each pair. and I laid them all out to make the broken dishes blocks.

While they were in order, I pinned them.

Took them to the machine and stitched ~

After the pairs were stitched, I then pressed those.

Pinned the pairs together and stitched. . .

Pressed with starch. . .

I pinned all the blocks up on the wall, if you use the same formula as me, you can get a center quilt that's a 7 blocks X 8 blocks layout.

I am almost finished with my Fat, Applique borders and should be able to update you soon with the result. The second half is even more exciting then the first. Also, I would like to add that this quilt WILL be done with the quilt -as-you-go method. . as usual ;c)

Sunday, October 23, 2011

Chewy Chicken and Dumplings Recipe


This is a recipe that was passed down to me by my Great-Grandmother on my Father's Side. I've altered the recipe a bit to be what we know today as "dumplings," but she called them simply "homeade noodles."
My Great-Grandmother's name was Myrtle, but since none of the kids could accurately pronounce her name, she was called Moo-Moo by everyone. Moo-Moo lived with her sister Peggy after both of their husbands passed. Every Christmas and Easter all their kids, grandkids, and great-grandkids would come and occupy their tiny house in Campbell's Creek, WV.
No matter what the meal was, Moo-Moo would always make her homeade noodles, and I loved them so much! I would beg her to give me some leftovers to take home with me. Then on the drive home (which took about an hour) I would sneak and eat them with my fingers until they were all gone!
To honor Moo-Moo's memory, the "Top Secret" homeade noodle recipe will stay in the family, but the slightly altered Chicken and Dumplings recipe I would like to share with you!

You Will Need:
*Cooked & Ready Rotisserie Chicken from the store ~or~
3 or 4 Bone-in Chicken Breasts baked at 350 for 1 hour.
*6 Large Eggs
*1/4 Cup of Oil
*1/4 Cup of Milk
*Pinch of Salt
*Pinch of Sugar
*Pinch of Pepper
*1T Baking Powder
*All-purpose Flour
*2 large cans of chicken broth (48oz?)
*1/2Cup Margarine (I use Country Crock)


In a large bowl, beat the 6 eggs until they're fluffy.
Add a pinch of Salt, Pepper, and Sugar. Mix
Add Oil and Milk, and Beat until foamy.
Start making your dough by sprinkling about a cup or so of flour over the liquid mixture and sprinkle your baking powder over to of that. Mix in with a large fork.
Continue adding flour a bit at a time, until you have a sticky dough.
When you're ready, dip your hands in flour, and work more and more flour in until you have a roll-able dough. YOu want it to be still a BIT sticky, but not too much.

Set your large bowl aside, do NOT wash it yet.
On a large clean surface, generously cover with flour. Lay your dough on the flour and with a rolling pin, roll until your dough is about 1/8"-1/4" thick. The thicker your dough, the fatter and chewier your dumplings will be.
Also, if you don't want to work directly on a kitchen surface, you can always tape down parchment or waxed paper and work on top of that.

Let your dough sit while you debone your chicken. Pull off the chicken into bite-sized strips.
In a large pot, pour in your chicken broth and set on high heat.
Add in 1/2 C of Margarine.
While your broth is heating, cut your dough into 1-2" squares.
In the large bowl that you set aside, take whatever leftover flour is on your surface and throw that in, and layer your pieces of dumplings, and flour. . The extra flour will help to thicken the broth/gravy.

Once all the dough is cut, and your broth is boiling, drop you dumplings in one at a time, picking up excess flour with them. What I mean is, do NOT shake off the excess flour from the dumplings before adding them to the broth. =cD
After 10 or so dumplings are added, make sure to STIR. Your dumplings will probably float to the top at first.

After all the dumplings are added, drop your chicken in there a bit at a time, while stirring constantly.

Turn down the temperature to low/simmer and cook for about 1/2 hour. After 1/2 hour turn off the heat and let the Chicken/Dumplings set for about 15 minutes to thicken up.

Serve with mashed potatoes and a green vegetable for a yummy comfort dinner!

Store the leftovers WITH the liquid in the pot - the gravy will be even better the next day!!!

Sunday, October 16, 2011

WV Bridge Day Festival Camping Trip and Geocaching

Every year, on the 3rd weekend of October, my husband and I go up to the Bridge Day Festival. It is held in Fayetteville, WV and celebrates the Northern Hemisphere's Longest Arch Bridge. The Bridge is truly an AWESOME spectacle to behold and during October the foliage is at its peak.

Here's a photo of the bridge I took from Wikipedia - of course, on Bridge Day, it is covered with mass amounts of people, arts and crafts vendors, and LOTS of yummy unique food!


The festival is only open from 9AM - 3PM, therefore there are LOTTTSSS of people crammed into a relatively small space. Oh, and did I mention, that along with the vendors and people, this is the one day a year when you can legally parachute off of the bridge? Yes, you can also repel. Bungee jumping is no longer allowed, too many . . .accidents.

Here's some photos of us on the bridge from last year:


But we don't go to watch the death-defying acrobats. No, we go because this is our home. It's a celebration of our state and its beauty. We love this area so much we even got married here!


~~~~~~~~~~~~~~~~~~~~~~~~~~~~~~~~~~~~~~~~~~~~~~~~~
I will now bore you with lots of photos of our recent Bridge Day/Camping/Geocaching Trip.

We started out Saturday by going straight to the Bridge for some lunch. We first had to brave all the traffic.

James was craving a turkey leg and roasted corn.


After our a short time on the crowded bridge, we went to pick out our camping site. We now love staying at the "Gorge Gateway Center." Lots of beautiful camping sites, clean bathhouses, and not too crowded. You can also choose between the "loud" and "quiet" camping sections. We chose the quiet section because we're old fogies now-a-days. LOL

James went to the bathhouse to freshen up, and I started a fire. I was very proud of my fire that I started by myself. I just used twigs and logs laying around the campground, and for kindling I used some scrap paper from my EPP quilting bag ;c) I knew all those subscription cards with hexagons cut out of them would come in handy one day~!


James unpacked the car, and I made our bed. The WV Mountains get very chilly at night so I brought 3 tubs full of blankets and quilts.
Here is our bed complete with the James tee-shirt quilt I made.


And Here is James the sleepy head the next morning. We were awoken by crows. . the really noisy ones!


We stopped at a gas station near the bridge for our morning coffee - pumpkin spice cappuccino and coffee. This is what I saw on the rocks near the gas station. Does anyone know the name of this quilt block?


On our way back from Bridge Day - we wanted to do a little geoaching. Geocaching is like a high-tech scavenger hunt. More info about this can be found HERE. We drove down beautiful Rt 60 from Fayetteville, to Charleston. Our first cache was GC260JM - "Coal Heritage GeoTrail #1.

This was an absolutely breathtaking hike along a trail that ran along a stream. There was a long wooden bridge, dripping cliffs, lots of waterfalls, and all the Fall colors one could imagine.
Here are some of my favorite photos from this:


Our next cache was near Hawk's Nest - which is another beautiful area with lots of overlooks and photo ops. Look what we saw here?! Another Quilt Block!


We got a few other caches on our way home. I am now VERY tired and have a busy week of quilting ahead. =cD
I am right now in the process of making a tee-shirt quilt for a customer, and I also am trying to finish another QAYG quilt pattern/tutorial. It's a fall-themed quilt so hopefully I can get that for you before the END of Fall ;c)